Get it wrong, and the consequences are concrete: blocked aisles that frustrate customers, unstable shelving that creates safety liability, poor product visibility that kills margins, and wasted floor space you've already paid rent on. Many stores end up doing costly rework within their first year simply because the planning phase was skipped or rushed.
This guide covers the complete rack setup process for mini supermarkets — from space assessment and zone mapping through rack selection, assembly, product loading, and post-installation validation.
Key Takeaways
- Follow this sequence: space assessment → zone mapping → rack selection → assembly and anchoring → product loading → validation
- Aisle width, weight capacity, and rack height must be decided before purchasing any shelving
- Gondola racks suit floor aisles best — add wall racks, slanted units, and end-caps based on your product mix
- Eye-level shelf placement increases sales by approximately 25% — allocate this space deliberately
- Skipping base levelling or floor anchoring causes structural instability that compounds under load
Planning Your Mini Supermarket Rack Setup: Before You Begin
Successful rack setup starts weeks before a single component is assembled. Poor decisions at the planning stage are the primary reason stores need expensive rework in year one — wrong rack types, incorrectly sized aisles, or zones that work against customer behaviour rather than support it.
The process covers four phases, each dependent on the previous:
- Space assessment and zone mapping
- Rack selection
- Physical assembly and anchoring
- Product loading and post-installation validation
Space Assessment and Zone Planning
Start with a floor space audit. Measure total square footage, mark every fixed structural element (pillars, electrical panels, entry and exit points) and calculate usable floor area available for racking.
For aisle widths, the industry benchmark for small-format grocery stores is 3–4 feet (0.9–1.2 m) for secondary aisles and a minimum of 44 inches (1.12 m) for main exit aisles to meet fire egress requirements. If your store uses shopping baskets rather than trolleys, narrower secondary aisles are workable — but never compromise the main exit aisle width.
Divide the floor into product zones before any rack is placed:
- Dry grocery
- Beverages
- Personal care and household
- Perishables / refrigerated section
- Checkout area
Zone logic directly affects customer behaviour and restocking efficiency. High-demand staples like oil, milk, and rice should be placed deeper in the store. Research confirms that longer in-store shopping paths have a direct positive influence on purchase volume, meaning customers who walk past more products buy more.
Non-negotiables before proceeding:
- Confirm the floor's structural load capacity can support fully-loaded gondola racks
- Ensure rack placement does not block fire safety exit clearances
- Verify no rack position obstructs CCTV coverage angles
Choosing the Right Rack Types for Your Mini Supermarket
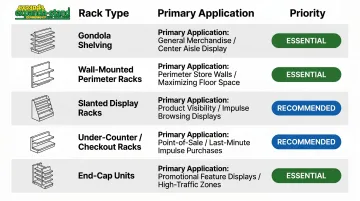
| Rack Type | Application | Priority |
|---|---|---|
| Gondola shelving (double-sided) | Central floor aisles | Essential |
| Wall-mounted perimeter racks | Boundary walls, maximise linear display | Essential |
| Slanted display racks | Fresh produce, impulse items near entry | Recommended |
| Under-counter / checkout racks | POS area, impulse additions | Recommended |
| End-cap units | Gondola run ends, promotional items | Recommended |
For the central aisles, gondola shelving is the industry standard globally and in the Indian market. Common Indian market dimensions (5–6 feet height, 3-foot bay width, 1.5-foot depth in powder-coated mild steel) align closely with international convenience-store specifications.
Key specifications to confirm before purchasing:
- Shelf load capacity per tier (verify with the specific manufacturer, not generic benchmarks)
- Adjustable shelf spacing with a standardised upright hole pitch
- Rack height relative to average customer eye level (the "golden zone" sits between 50–65 inches from the floor)
- Powder-coated mild steel finish — standard for durability and hygiene in food retail
For stores with irregular floor plans, column interruptions, or non-standard dimensions, working with a manufacturer that offers custom-dimensioned solutions avoids the frustration of purchasing racks that simply don't fit the space. Confirm whether your supplier can accommodate a 50mm adjustable shelf pitch and Tegometall-compatible uprights before finalising any purchase order.
How to Set Up Racks in a Mini Supermarket: Step-by-Step
Rack assembly follows a strict sequence. Shortcuts — particularly skipping base levelling or anchoring steps — create structural instability that compounds under load and become a serious safety liability once shelves are stocked.
For a mini supermarket of 500–1,500 sq. ft., plan for a total fitout window of 4–6 weeks, which covers design, approvals, fixture installation, and handover. Rack assembly alone is a subset of this timeline, but it should not be compressed to a single day.
Assembling and Anchoring Your Racks
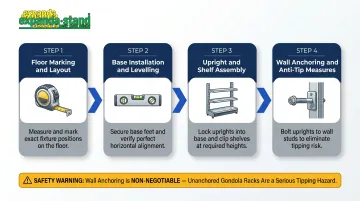
Step 1 — Floor marking and layout
Translate your zone plan onto the physical floor using chalk lines or tape. Mark exact gondola positions, aisle centrelines, and wall rack positions before any assembly begins. This step prevents misaligned aisles and ensures the planned customer flow path is preserved in the physical space.
Step 2 — Base installation and levelling
Install gondola base plates and use a spirit level to confirm perfect horizontal alignment. Racks that are even slightly off-level will lean progressively under load and create tip-over risk. On uneven floors — common in older or converted retail spaces — use shims under the base plates to achieve a level surface before securing.
Step 3 — Upright and shelf assembly
Attach uprights to base plates, lock in cross-braces for structural rigidity, and insert adjustable shelf clips at the correct tier heights for the product category assigned to each bay. Uprights must be confirmed plumb before any shelves are loaded. Set shelf heights using a standard template for each product category — not bay by bay — to ensure visual consistency across the gondola run.
Step 4 — Wall anchoring and anti-tip measures
All freestanding gondola runs in high-traffic retail environments must be anchored — either to the wall via wall brackets or to adjacent bays using top horizontal connectors. This is both a safety requirement and a liability issue, particularly in stores where children or large shopping baskets are present.
For tall or heavily loaded units, floor anchor plates are standard practice. Follow the installation specifications provided with your gondola system and do not skip this step regardless of timeline pressure.
Strategic Product Loading After Assembly
Once assembly is complete and structural checks are done, load shelves according to this vertical principle:
- Bottom shelves — heavy, bulky, or value-priced items
- Eye level (50–65 inches from floor) — high-margin and fast-moving SKUs; this is your most valuable shelf real estate
- Top shelves — lighter, bulk, or less frequently purchased items
Loading shelves unevenly across their width causes bowing over time. Distribute product weight across the full shelf span, not concentrated in the centre.
Placement strategy doesn't stop at the gondola. How you position your first rack relative to the store entrance matters just as much as how you load it.
The first 5–15 feet inside your store entrance is a decompression zone — shoppers are still mentally transitioning from outside and routinely miss products placed here. Keep this area clear and begin your first gondola run beyond this threshold. At the far ends of gondola runs, position promotional end-caps: they're visible from multiple angles and reliably drive impulse purchases when stocked with high-contrast or value-priced items.
Post-Setup Checks and Validation
Never load racks to full stock capacity before completing structural validation. Problems that are invisible on empty racks surface quickly under the weight of a full product load.
Run two rounds of checks before stocking begins — one for structure, one for the customer experience.
Structural checks:
- Use a spirit level to confirm all uprights are plumb
- Tug-test each bay — any rocking indicates anchoring or levelling issues
- Verify all shelf clips are fully locked into upright notches
- Confirm all wall anchors and floor bolts are secured
Once the frame is sound, shift your focus to how the layout actually functions on the floor.
Functional walk-through:
- Walk the store as a customer would — identify any sight-line obstructions
- Measure aisle widths with racks in position (not just on the floor plan)
- Check for sharp rack edges at head or shoulder height
- Confirm promotional end-caps are visible from the store entry point
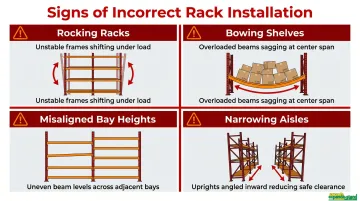
Even well-anchored racks can fail a functional check. Watch for these common signs of incorrect installation before you open:
Signs of incorrect installation:
- Racks that rock when pushed
- Shelves that bow under light loads
- Misaligned bay heights across adjacent gondolas
- Aisles that narrow unexpectedly where gondola depth meets product overhang
Fixing these in an empty store takes minutes. Fixing them after opening costs significantly more — in time, disruption, and risk to customers.
Common Rack Setup Problems and How to Fix Them
Even a well-planned rack layout can run into problems during installation or after the store opens. Here are the three most common issues mini supermarket owners face — and how to correct them.
Racks That Wobble or Tilt Under Load
Gondola racks shake or lean once shelves are stocked.
Likely cause: Base plates aren't properly anchored, uprights aren't plumb, or freestanding gondola bays haven't been connected to adjacent bays or walls.
Fix: Re-level the base using shims, bolt base plates to the floor where feasible, and link adjacent gondola bays with top horizontal connectors to form a stable, rigid run.
Aisle Congestion and Poor Customer Flow
Customers struggle to navigate — particularly near checkout or the produce zone.
Likely cause: Rack placement didn't account for gondola depth plus product overhang, so the effective aisle width ends up narrower than planned.
Fix: Re-measure aisle widths with racks fully loaded and products in place. If clearance falls below the minimum, remove one gondola bay from that run or swap a double-sided gondola for a single-sided wall rack in the congested zone.
Inconsistent Shelf Heights Across Bays
Shelf tiers don't align across adjacent gondola bays, creating a fragmented look that makes pricing hard to read and weakens merchandising impact.
Likely cause: Someone set shelf clips independently for each bay without a standard height template, or different rack models with incompatible upright hole pitches were mixed across the same zone.
Fix: Establish a standard shelf height template for each product category before assembly begins. Source all racks for a single zone from the same manufacturer to ensure compatible upright pitch across the entire gondola run.
Pro Tips for a Smarter Mini Supermarket Rack Setup
A few decisions made early in your setup process can save significant time and money later. Keep these in mind before your first rack goes in:
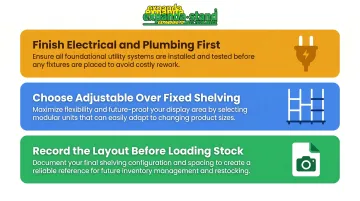
Finish electrical and plumbing first. Refrigeration connections and lighting must be in place before any rack is assembled. Retrofitting wiring around installed gondola runs is expensive — and sometimes requires dismantling entire bays.
Choose adjustable shelving over fixed. Fixed-height shelving forces costly reconfiguration when your product mix changes seasonally. Modular systems with peg-hole uprights — like the 50mm pitch systems common in the Indian market — allow shelf repositioning in minutes without tools.
Record the layout before loading stock. Photograph the completed rack layout, shelf height settings, and anchor points before products go in. That record helps with maintenance, insurance claims, and replicating the setup when you expand.
Frequently Asked Questions
How much does it cost to set up a mini supermarket in India?
Total investment for a mini supermarket typically ranges from ₹5 lakhs to ₹30 lakhs depending on size and location. Infrastructure — racks, lighting, counters, and refrigeration — accounts for approximately ₹5–10 lakhs of that figure, with individual gondola units available from around ₹5,600–6,300 per piece from Indian manufacturers.
How much does it cost to open a supermarket in India?
Opening a mini supermarket in India generally requires ₹12–₹45 lakhs depending on scale, location, and whether the space is owned or leased. Rack and shelving fixtures are a notable portion of setup costs, alongside initial inventory and billing systems.
Are small supermarkets profitable?
Yes, with the right location, product mix, and store layout. Food and grocery retail operating margins typically run at 6–7% (CRISIL), so efficient space utilisation through well-planned rack setup directly affects profitability — more product on display per square foot means higher revenue potential without increased rent.
What is the 3-3-3 rule for groceries?
The 3-3-3 method is a consumer shopping habit — buy 3 vegetables, 3 proteins, and 3 carbs per weekly shop to simplify meal planning. It's not a retail shelf-stocking standard. Retailers should reference planogram principles (eye-level placement, vertical zone loading) rather than consumer shopping heuristics when configuring shelves.
What is the 5-4-3-2-1 grocery rule?
The 5-4-3-2-1 method is a personal shopping guide consumers use to structure their weekly grocery list — not a retail merchandising standard. For shelf configuration, apply vertical zone loading: heavy items on the bottom shelf, high-margin SKUs at eye level, and bulk items on top.
What is the 1/3 rule in supermarkets?
The 1/3 rule is not an established shelf merchandising standard in retail trade or FMCG literature. The relevant principle is the "rule of three" in visual merchandising — grouping products in sets of three for visual appeal — paired with standard facing width practices for visibility and restocking efficiency.