Introduction
Products fail on shelves not because they're low quality — they fail because shoppers never notice them. A well-made product placed on the wrong shelf, in the wrong fixture, at the wrong height might as well not exist.
POPAI's grocery display research found that 76% of purchase decisions happen in-store, which means your display execution is your most powerful sales tool. Yet most supermarkets treat display as an afterthought — shelves get stocked based on convenience, not strategy.
The gap between a store that grows consistently and one that plateaus usually comes down to systematic display execution: layout planning, fixture selection, eye-level compliance, and regular refresh cycles. Small errors compound fast. A product sitting 30 cm below eye level. An endcap left unactivated for two months. Shelves stuffed without a planogram. Each one costs you sales.
This guide covers the exact steps to set up supermarket product displays — the fixtures, the variables that drive results, and the common mistakes worth avoiding.
Key Takeaways
- Map shopper flow before placing a single product; layout determines which zones actually convert
- Reserve the eye-level shelf band for best-sellers and high-margin SKUs; this single decision has the highest sales impact
- Build a planogram first: it cuts out-of-stocks, restocking errors, and shelf assignment guesswork
- Endcaps and checkout zones punch above their floor space — use them with a clear commercial purpose
- Display failures are almost always execution failures, not product failures
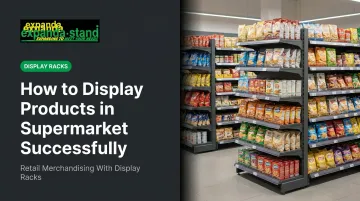
How to Display Products in a Supermarket: Step-by-Step
Step 1: Plan Your Store Layout and Shopper Flow
Before touching a single shelf, map the natural path shoppers take from entry to exit. High-footfall zones — the entry area, main cross-aisles, and checkout approach — are your highest-value real estate.
A practical principle: place staple items like dairy, eggs, and bread toward the back of the store. This routes customers through promotional and impulse-buy zones before they reach what they came for. Research on one-way aisle configurations found that structured path designs can increase store-area coverage by 67% — and a 10% increase in path length correlates with a 16.1% rise in unplanned spending.
Key zones to plan deliberately:
- Transition/decompression zone — the area just inside the entrance where shoppers orient themselves; avoid cluttering this with heavy promotions
- Action alley — the perimeter aisle stocked with features, discount bins, and sampling displays
- Endcap positions — aisle terminations visible from intersections without requiring shoppers to enter the aisle
- Checkout corridor — the final impulse opportunity before the transaction closes
Group complementary products in adjacent sections. Snacks near beverages, herbs near fresh produce, jams near bread — these adjacencies trigger associated purchase behaviour and increase basket size without additional floor space.
Step 2: Create a Planogram Before Placing Products
A planogram is a visual blueprint that assigns each product a specific shelf position, height, and facing count based on sales velocity, margin priority, and supplier agreements. It is a control system, not just a layout document.
Why planograms matter operationally:
- Gruen and Corsten's FMCG research found that a 10% improvement in planogram compliance corresponds to a 1% reduction in out-of-stocks — and out-of-stocks cost retailers roughly 4% of annual sales
- 91% of SKUs in the study were allocated shelf space based on case-pack size rather than demand — a widespread mismatch that planograms correct
- Consistent planograms reduce restocking confusion and make compliance audits straightforward across multiple branches
Standard shelf assignment logic:
| Shelf Position | Product Type |
|---|---|
| Top shelf | Premium, niche, or brand-led items |
| Eye-level (2nd & 3rd shelf) | Best-sellers, high-margin SKUs |
| Bottom shelf | Bulky staples, low-turn items, economy SKUs |
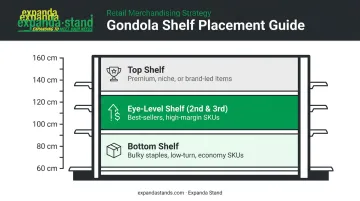
Build your planogram using actual sales velocity and margin data — not gut feel or available stock levels.
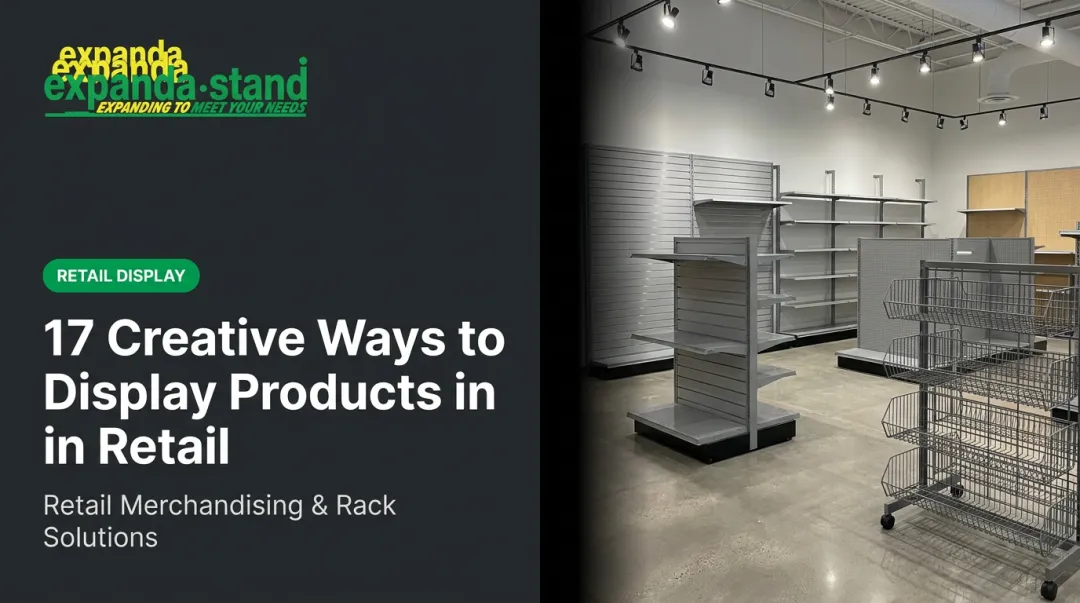
Step 3: Select and Position the Right Display Fixtures
Fixture choice is where many stores go wrong. The wrong unit for the zone undermines the entire display strategy.
Core fixture types and their roles:
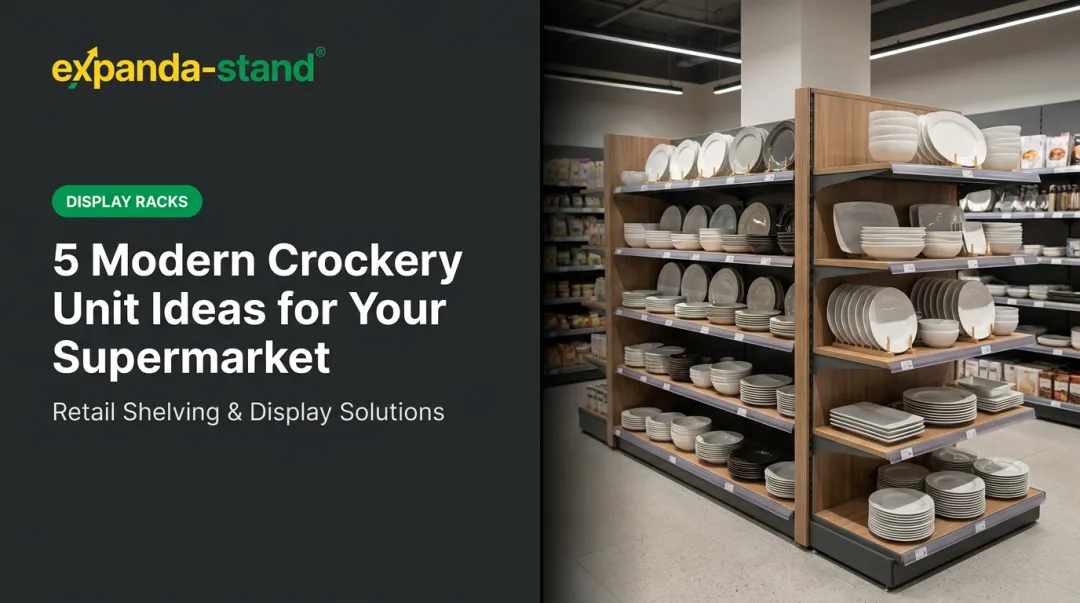
- Gondola shelving — double-sided units forming main aisles; the backbone of any supermarket floor plan
- Endcap displays — mounted at aisle terminations; high visibility, high conversion
- Freestanding floor units — positioned in action alleys or promotional zones for campaign-driven product pushes
- Checkout countertop units — small-format displays for impulse products within arm's reach during queuing
Expanda Stand manufactures all of these categories for supermarket and hypermarket environments. Their Island/Gondola Shelving systems include adjustable shelves with 50mm pitch, tool-free assembly, and Tegometall-compatible fittings that align with international planogram standards. Wall/End Supermarket Racks cover endcap placements, while Cashier Gondolas and Promo Bins/Dump Bins handle checkout and promotional zone requirements.
Position your highest-priority fixtures — endcaps and freestanding promotional units — where they intersect with the footfall paths identified in Step 1. An endcap placed on a low-traffic aisle performs no better than a standard shelf.
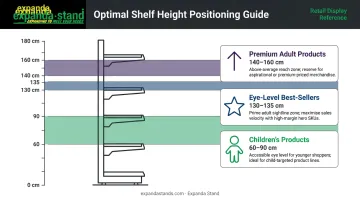
Step 4: Optimise Eye-Level and Vertical Space
Eye-level shelf positioning is the single highest-impact variable in supermarket merchandising. Research by Dreze, Hoch, and Purk found that moving a product from the worst to the best vertical shelf position increased sales by 39% on average. The optimal position sits at approximately 130–135 cm from the floor — reserve this band for your best-selling and highest-margin SKUs.
Additional vertical space considerations:
- Children's products — lower them to 60–90 cm to match child sightlines; this influences purchase requests at the point of decision
- Premium adult products — position slightly above general eye-line at 140–160 cm to signal aspirational value
- Produce and bakery sections — use tiered and multi-level displays to create visual abundance and fill vertical dead space
Shoppers spend about 8 seconds on each product purchase decision, according to Supermarket Perimeter. Products that aren't immediately visible within that window rarely get considered.
Step 5: Add Signage, Lighting, and Seasonal Elements
Signage acts as a silent salesperson at the moment of decision. Install shelf talkers, price alert signs, and category headers to guide navigation and flag promotions. The goal is to reduce cognitive load — shoppers should be able to identify what's on offer without stopping to decode the shelf.
Practical signage and presentation priorities:
- Shelf talkers for promotional price callouts directly below the product
- Category headers at aisle entry to help shoppers self-navigate
- Focused lighting above fresh produce, bakery, and premium displays to enhance perceived freshness and quality
- Seasonal refresh every campaign cycle — static displays lose effectiveness quickly as shoppers habituate to them
Standard practice is to review core planograms quarterly. Promotional displays should rotate per campaign cycle — roughly every 2–4 weeks depending on your trade calendar and sell-through rates.
What You Need Before Setting Up Supermarket Displays
Preparation determines how well any display strategy actually performs. A well-designed planogram fails without the right fixtures, data, and trained staff to execute it.
Display Fixtures and Store Fittings
The minimum fixture set for a functional supermarket display operation:
- Gondola shelving for main aisles (adjustable, durable, compatible with standard accessories)
- Endcap units for aisle terminations
- At least one freestanding floor display for promotional zones
- Checkout counter units for impulse products
Fixture selection should account for your store's planogram requirements from the start — retrofitting shelving mid-rollout is costly and disruptive. Expanda Stand manufactures gondola shelving and display systems with custom sizing options suited to Indian supermarket and hypermarket layouts.
Product Readiness and Planogram Data
Before shelf assignment begins, organise products by category, margin tier, and sales velocity. Without this data, placement is guesswork. Gather:
- Sales velocity by SKU (units sold per week)
- Gross margin by product
- Supplier co-op or listing agreements that specify shelf placement requirements
Staff Training and Maintenance Readiness
The best-designed display degrades without disciplined maintenance. Train display teams on:
- Planogram compliance and facing standards
- Restocking triggers and frequency
- Escalation procedures when stock levels drop below minimum facing counts
A display ignored for six weeks will show it. Shoppers interpret empty shelves and broken facings as a signal about overall store quality — and that perception directly affects basket size.
Key Factors That Determine Supermarket Display Success
Two stores with identical products can produce dramatically different results. These four variables explain most of the gap.
Shelf Positioning and Eye-Level Compliance
The 39% average sales increase from optimal vertical positioning (Dreze, Hoch, and Purk) is the strongest quantified evidence for why eye-level compliance matters. Moving toothbrushes to eye level in the same study increased oral care category profits by 6% — from a single shelf adjustment.
Audit eye-level compliance regularly. Planograms drift. Products get moved during restocks. Without periodic checks, high-margin SKUs quietly migrate to less effective positions.
Cross-Merchandising and Product Adjacency
Pairing complementary products triggers associated purchase behaviour. These adjacencies work because they surface a product at the moment a shopper is already thinking about a related category:
- Chips placed near beverages
- Jams shelved alongside bread
- Herbs positioned near fresh produce
Progressive Grocer reported that three-quarters of surveyed retailers cross-merchandise deli products across the store — a category with a 43.9% gross margin — precisely because adjacency reliably expands basket content without additional promotions.
Display Fixture Quality and Presentation
Overcrowded, damaged, or poorly organised fixtures reduce shopper confidence. A shelf that looks chaotic signals low quality, regardless of what's on it. Iyengar and Lepper's grocery jam study demonstrated this concretely: 24 jam varieties attracted more attention but converted only 3% of browsers, while 6 varieties converted 30%.
The implication for fixtures: clarity and organisation matter as much as variety. Sturdy, correctly sized shelving with appropriate load capacity maintains consistent presentation and reduces the frequency of display resets. Expanda Stand's powder-coated steel shelving systems are built specifically for the demands of supermarket and hypermarket environments.
Promotional Zone Activation
Endcaps are among the highest-performing display positions in any supermarket. A 2018 Journal of Retailing and Consumer Services study found endcaps can generate between 23% and 1,197% sales uplift compared to standard shelf conditions. Rear endcaps in the study averaged 416% total brand sales uplift.
Yet many stores leave endcaps un-activated or rotate the same product for months. Treat endcaps as premium advertising space: plan them into your promotional calendar and refresh them on a fixed schedule.
Common Mistakes When Displaying Products in Supermarkets
Even well-stocked stores lose sales to avoidable layout errors. These four mistakes show up repeatedly across supermarkets of all sizes:
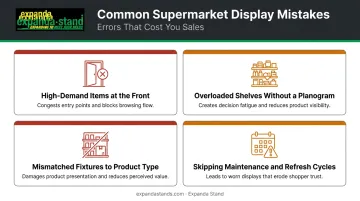
- Placing high-demand items at the front cuts off the shopper journey before it starts. Staples belong at the back to route customers through impulse and promotional zones.
- Overloading shelves without a planogram assigns space by convenience, not data — pushing high-margin products out of the sightline and making restocking inconsistent.
- Mismatching fixtures to product type undermines placement regardless of location. Heavy items on lightweight shelving, impulse goods in floor-level bins, or fresh produce in non-ventilated units all hurt both product integrity and sales.
- Skipping maintenance and refresh cycles lets strong initial setups decay fast. Missing price tags, empty facings, and outdated promotional signs signal neglect — and shoppers notice.
Frequently Asked Questions
What is the best shelf height to place products in a supermarket?
The eye-level band — approximately 130–135 cm from the floor — is the best-performing position for sales. Shelf-management research shows a 39% average sales increase when products move to this optimal vertical zone. Reserve it for best-sellers and high-margin SKUs.
What is a planogram and why does it matter for supermarket displays?
A planogram is a visual layout blueprint that assigns each product a specific shelf position based on sales velocity and margin data. Consistent planogram use reduces out-of-stocks, standardizes placement across branches, and ensures shelf space reflects actual demand — not case-pack convenience.
How can I increase impulse purchases through product displays?
Place affordable, high-desire items at checkout counters, endcap positions, and the store entrance. Cross-merchandising also drives unplanned purchases — grouping snacks next to beverages, for example, catches shoppers already browsing a related category.
What types of display fixtures work best in supermarkets?
Gondola shelving for main aisles, endcap displays for aisle terminations, freestanding floor units for promotional zones, and countertop or cashier gondola displays near checkout. Fixture choice should match the product type, zone traffic volume, and available floor space.
How often should supermarket product displays be updated?
Promotional displays should be refreshed per campaign cycle — typically every 2–4 weeks, aligned with your trade calendar and sell-through rates. Core aisle planograms benefit from quarterly reviews, or sooner when sales data signals underperformance in a specific category.
What is the difference between a gondola display and an endcap display?
Gondola displays are double-sided shelving units that form the main aisles. Endcap displays occupy the short end of a gondola row, visible from the aisle intersection. Because shoppers see them without entering the aisle, endcaps consistently outperform standard shelf positions for promotional sales.