Introduction
Most retailers spend considerable time choosing display racks — comparing materials, dimensions, and costs — then arrange them once and never revisit the decision. The rack becomes a permanent fitting rather than a sales tool, and margins shrink as a result. Studies consistently show that over 70% of purchase decisions are made in-store, which means how you display products matters as much as what you stock.
The reality is that placement, visual merchandising, and regular optimisation matter as much as which rack you buy. A mid-range gondola in the right spot, stocked correctly and refreshed seasonally, will consistently outperform a premium fixture that's been treated as a permanent fitting.
This guide covers 10 practical tips — eye-level placement, endcap strategy, cross-selling, vertical zoning, and sales tracking — to help you extract maximum revenue from every fixture in your store.
TL;DR: Quick Wins at a Glance
- Place your best-selling or highest-margin SKUs at eye level (4–5 feet from the floor) to capture impulse decisions
- Endcaps and high-traffic zones convert best — use them for promotions and new launches
- Group complementary products on the same rack section to naturally grow basket size
- Rotate 20–30% of your display floor each season so repeat shoppers always find something new
- Track sales per linear foot by rack section — drop underperformers and shift space to faster movers
Tips 1–3: Placement and Store Layout
Where a rack sits in your store — and how it fits into the customer's physical journey — is the single biggest lever for unplanned purchases. Poor placement means even the best-stocked rack gets ignored.
Tip 1: Place High-Demand Products at Eye Level
A 2009 academic in-store experiment published in PMC found that middle-shelf placement at roughly 123 cm produced mean relative sales of 7.5% in Store A versus just 4.0% at the lowest shelf and only 3.3% at the highest shelf. Store B showed a similar pattern.
The practical implication is clear: reserve the 120–150 cm zone for your highest-margin or fastest-moving SKUs. Push slower movers and bulk sizes to lower shelves where shoppers who are actively searching will still find them.
This rule applies consistently across fixture types:
- Gondola shelving — prime the middle two shelves per bay
- Wall-mounted slatwall and channel racks — the same 120–150 cm sweet spot holds
- Pegboard panels — hang your hero SKUs at standing eye height, accessories and lower-velocity lines below
The top shelf is not wasted space. It's signage and branding territory. More on that in Tip 8.
Tip 2: Use Endcaps and Entry Points to Capture Impulse Buys
Endcaps are among the highest-productivity fixtures in any store. A 2018 study in the Journal of Retailing and Consumer Services found that rear endcaps generated a 416% total brand sales uplift and front endcaps 346%. The same research notes that roughly 2% of supermarket items promoted on endcaps or off-location displays contribute an estimated 30% of total supermarket sales.
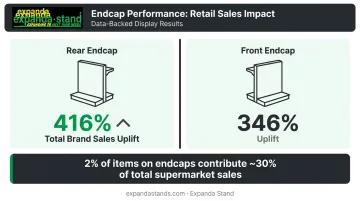
That ratio (2% of items, 30% of sales) makes endcap real estate your most valuable square footage.
Put that space to work strategically:
- Reserve endcaps for promotional, seasonal, or new-launch products rather than staple replenishment items customers already seek out
- Entry-point displays work best just past the decompression zone (the first 3–5 metres inside the entrance, which shoppers use to orient themselves and should be kept clear of product)
- Checkout counter racks are your strongest position for low-ticket, fast-grab impulse items
Tip 3: Design Your Rack Layout to Guide Customer Traffic Flow
Most shoppers travel a predictable path (the "power aisle") through your store. Placing display racks perpendicularly to this path maximises product exposure across multiple categories as shoppers move through.
Two layout principles to act on immediately:
- Keep aisles clear. Blocked sightlines and narrow paths cause shoppers to turn back early, cutting the number of racks they engage with. India's National Building Code (NBC 2016) recommends a minimum 90 cm clear aisle width — treat this as your practical floor when planning layouts.
- Use fixture height strategically. Keep racks under 135 cm at the front to maintain open sightlines. Build to taller gondolas deeper in the store. This visual hierarchy naturally pulls customers further in and increases the number of rack sections they browse.
Tips 4–6: Visual Merchandising on the Rack
Once racks are in the right location, how products are arranged and presented on them is what converts a browser into a buyer. Done well, visual merchandising on the rack costs nothing extra — and consistently drives more sales from the same floor space.
Tip 4: Use Signage and Price Communication Clearly
Unclear or absent pricing is one of the most common reasons shoppers put a product back. A display rack without a visible price tag or shelf talker loses conversion even when the product is perfectly positioned.
Practical rules for pricing on racks:
- Place shelf talkers, header cards, and price strips at a consistent, readable height — roughly 54 inches works well for standing adults
- Keep signage free of clutter so it falls within the shopper's natural 3-second scan as they walk past
- Promotional racks should carry a distinct visual cue — a contrasting colour strip or a "Sale" / "New" badge — visible from the aisle, not just when someone is standing directly in front of the fixture
A promotional rack that looks identical to a standard fixture from 5 feet away is a missed conversion.
Tip 5: Group Complementary Products Together to Drive Cross-Selling
When a shopper picks up one item and sees a directly related product displayed on the same rack section or an adjacent clip strip, the brain processes it as a natural pair rather than a separate purchase decision. That reduced friction is the mechanism behind cross-selling.
For example:
- Shampoo displayed alongside a matching conditioner on the same gondola section — the association is obvious and the reach distance is negligible
- Phone cases displayed on a spinner rack directly beside the prepaid SIM counter — the purchase context makes the accessory feel essential
Group products by how customers use them, not by how your internal category management is organised. Restructuring even two or three rack sections around use-case logic can lift average transaction value without adding a single SKU.
Tip 6: Keep Every Rack Fully Stocked and Neatly Organised
Empty shelves actively cost you sales — and not just the immediate lost transaction. ECR Europe research found that when shoppers encounter an out-of-stock item, 37% switch to a competing brand, 21% switch stores entirely, and 9% don't buy at all. Average out-of-stock rates in supermarkets run at 7.1%, with peaks above 30%.
Gaps on a rack also signal poor quality to passing shoppers — the assumption that remaining products are leftovers nobody else wanted.
Two habits that fix this:
- Set a daily minimum facing count per shelf position. When a shelf drops below this count, it triggers a restock rather than waiting for full depletion
- Run a rack-tidy walk at the start and midpoint of each trading day — products back in position, sizes grouped correctly, toppled items straightened
These three tips cover what happens on the rack itself — the next set focuses on the fixtures and formats that make that presentation possible at scale.
Tips 7–8: Choosing and Matching the Right Rack
The design and material of the rack itself communicates brand value before a customer reads a single price tag. Using the wrong fixture type for a product category can suppress sales even when placement and merchandising are correct.
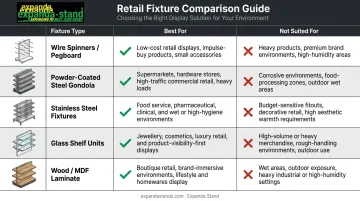
Tip 7: Match Rack Type and Material to Your Product and Brand Tier
| Fixture Type | Best For | Not Suited For |
|---|---|---|
| Wire spinners / open pegboard | Accessories, low-ticket impulse items | Premium or heavy products |
| Powder-coated steel gondola | Mid-market FMCG, pharmacy, general retail | Fresh produce requiring hygiene washes |
| Stainless steel fixtures | Fresh produce, food retail | Brand-heavy premium environments |
| Glass shelf units | Pharmacy, premium specialty retail | High-volume, high-turnover categories |
| Wood/MDF with laminate finish | Boutiques, premium specialty | Industrial or heavy-load environments |
Beyond aesthetics, load capacity is a hard constraint. Acrylic shelving and wire grid panels are not built for heavy items like canned goods, power tools, or paint.
Retailers should look for fixtures with clearly marked per-shelf weight ratings. Gondola systems from reputable manufacturers can handle up to 500 kg per shelf, while industrial-grade steel shelving starts at 550 kg and scales significantly higher for warehouse applications.
For retailers who need both aesthetic fit and structural load performance in one fixture, that combination is worth checking at the specification stage. Expanda Stand's range covers this spectrum — from pegboard and slatwall display panels for accessories and blister-packed items to powder-coated steel gondola shelving and heavy-duty storage racks, all manufactured to ISO 9001:2015 standards. Their custom fabrication capability is useful when standard dimensions don't meet the brief: dimensions and finishes are built to order.
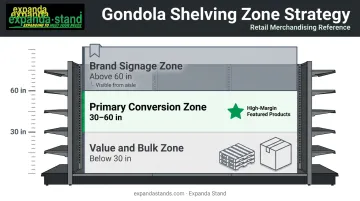
Tip 8: Use Vertical Space Intelligently on Every Rack
Most retailers underutilise the top third of their gondolas and freestanding racks. A practical three-zone model:
- Top zone (above 60 inches): Brand signage, header panels, hero product imagery, seasonal banners — visible from across the store, not for selling product
- Middle zone (30–60 inches): Featured and high-margin products — this is your primary conversion zone
- Bottom zone (below 30 inches): Bulk sizes, heavy items, or price-driven lines that shoppers will bend to reach when motivated by value
Expanda Stand's gondola systems include integrated header and subheader panel options as standard, which makes implementing this zoning straightforward without requiring additional signage fixtures. The adjustable 50mm pitch shelf system also means the middle zone can be reconfigured for different product heights without tools.
Tips 9–10: Refresh, Measure, and Optimise
Display racks are not set-and-forget assets. Retailers who outperform competitors treat their display floor as a living layout: audited, refreshed, and optimised based on actual sales data.
Tip 9: Rotate and Refresh Displays Seasonally (and Around Key Events)
Repeat shoppers habituate quickly to a static display. After two or three visits, a rack that hasn't changed becomes invisible — they walk past it without engaging.
Seasonal resets give loyal customers a reason to re-engage with sections they already know. Build a simple yearly refresh calendar around India's key retail periods:
- Diwali / festive season — your highest-traffic window; themed displays on endcaps and entry racks
- New Year (January) — resolution-driven categories, new product launches
- Summer (April–June) — seasonal merchandise, cooling products, outdoor categories
- Back-to-school / monsoon — stationery, rainwear, household essentials
Rotating even 20–30% of the display floor each season creates a perception of freshness across the entire store — repeat shoppers notice the change and explore further.
Expanda Stand's gondola range is built for this kind of flexibility. Shelf heights adjust on a 50mm pitch, sections can be added or removed, and accessories swap across fixtures — so a seasonal reset requires labour time, not new capital expenditure.
Tip 10: Track Sales Per Linear Foot and Audit Rack Performance Regularly
Sales per linear foot is the clearest metric for rack ROI. The formula:
Total net sales from a rack section ÷ Linear feet of merchandised face = Sales per linear foot
Rack sections falling below your store's average are either in the wrong location, carrying the wrong product mix, or overdue for a visual merchandising refresh.
Run a quarterly floor walk combining this metric with a visual check:
- Empty shelves or low facing counts
- Damaged or missing price strips
- Cluttered or disorganised product groupings
- Racks in low-traffic zones that haven't changed in months
Identify the bottom 10–15% of rack sections and rotate or reconfigure them. Done quarterly, this habit shifts your merchandising decisions from opening-day assumptions to live data — which is where consistent sales growth actually comes from.
Frequently Asked Questions
How do display racks increase retail sales?
Well-placed, properly merchandised display racks increase product visibility, slow shopper movement through the store, and trigger unplanned purchases. Grouping complementary products on the same fixture also encourages cross-selling, directly lifting both transaction count and average basket size.
What is the best position for a display rack in a retail store?
Endcaps, the right-turn power wall, and the area just past the entry decompression zone deliver the highest impulse-purchase conversion. For low-ticket, fast-grab items, the checkout counter is the strongest single position in the store.
How often should I change my retail display rack layout?
A full reset should coincide with major seasonal shifts — at minimum 3–4 times per year. Smaller refreshes (topping up stock, updating signage, rotating featured products) should happen weekly to maintain shopper engagement between full resets.
What type of display rack is best for a supermarket or pharmacy?
Gondola shelving with adjustable shelves is the standard choice for high-SKU environments like supermarkets and pharmacies. Endcap units and counter-height impulse racks near payment points complement the main runs and drive additional purchases.
How do I choose the right display rack for my product?
Start with three factors: the purchase decision you want to trigger (impulse vs. considered), your product's actual weight and load requirements, and the visual finish that fits your store's brand tier — value, mid-market, or premium. If no standard fixture checks all three boxes, custom-fabricated racks built to your exact dimensions are a practical solution.