The stakes are concrete. A rack row that looks stable when empty can shift, tip, or buckle under the first full load if alignment and anchoring weren't done right.
This guide walks through all 7 steps — from layout planning to final safety accessories — so your installation goes in straight, stays anchored, and carries its rated load safely for years.
Key Takeaways
- Floor preparation, plumb alignment, and anchoring are non-negotiable — skip none of them
- Inspect every component before assembly. Bent, cracked, or missing parts don't belong on the rack
- Snap a chalk line first, then build every bay off that reference
- Square and plumb each bay before drilling anchor bolts into the floor
- Complete post-installation checks and fit all safety accessories before loading anything onto the rack
Before You Begin: Prerequisites, Safety, and Tools
Verify Site Conditions First
Before a single upright is lifted, confirm these floor and site conditions:
- Concrete slab: Most rack suppliers specify a minimum 150 mm (6-inch) slab at 3,000 psi compressive strength for normal-duty pallet racks. Have your structural engineer verify actual slab thickness, concrete strength, and ground conditions against the rack supplier's column reaction schedule before ordering
- Floor levelness: Measure across the full installation footprint; uneven floors require shims and affect every alignment decision downstream
- Overhead obstructions: Mark ducts, electrical panels, sprinkler heads, and structural columns with tape before layout begins — OSHA requires 18 inches (45.7 cm) minimum clearance between sprinkler heads and stored material below
- Building columns and walls: These affect aisle widths and bay positioning; account for them in your layout drawings
PPE and Safety Requirements
Every crew member must be equipped and trained before work begins:
- Hard hat, steel-toed boots, safety glasses, and gloves
- Full familiarity with the installation sequence before work starts — improvising the order creates structural risk
- For Indian facilities, refer to DGFASLI's Model Rules under the Factories Act, 1948, alongside site-specific hazard assessments
Tools Checklist
| Category | Items Required |
|---|---|
| Layout | Chalk line, tape measure, permanent marker |
| Assembly | Rubber mallet, level, beam locking pins |
| Anchoring | Hammer drill with masonry bits, torque wrench, anchor bolts, shims |
| Lifting | Forklift or lifting equipment (required for uprights above waist height) |
One practical note on sourcing: components from ISO 9001:2015 certified manufacturers arrive with verified load ratings and consistent dimensions. This matters during assembly — mismatched parts from uncertified suppliers are a common cause of rework and alignment problems. Expanda Stand's pallet racks are manufactured under ISO 9001:2015 certification, which means tolerances are held and load specifications are traceable.
7 Steps to Set Up Pallet Racks in Your Warehouse
Installation follows a fixed sequence. Skipping or reversing steps (particularly anchoring before alignment) creates structural problems that are difficult to correct without partial disassembly.
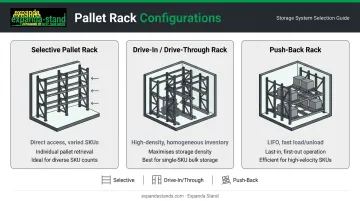
Step 1: Plan Your Layout and Select the Right Rack Type
Measure the full floor area, ceiling height, and all aisle widths. Then determine which rack configuration suits your inventory:
- Selective pallet racks: Direct access to every pallet — best for varied SKUs and frequent picking
- Drive-in/drive-through racks: High-density storage for homogeneous inventory using LIFO or FIFO
- Push-back racks: High-density LIFO storage with fast loading and unloading
For aisle widths, there is no single mandated number for rack aisles. A common reference point is approximately 3.6 m (12 feet) for standard counterbalance forklifts, narrowing to around 2.1 m (7 feet) for reach or turret trucks. Calculate the minimum from your specific truck model and loaded pallet dimensions.
Map bay positions, beam elevations, and forklift clearance corridors on paper before any assembly begins.
Step 2: Unpack and Inspect All Components
Unpack all uprights, beams, footplates, connectors, and hardware. Cross-check every item against the bill of materials.
Replace before proceeding — no exceptions:
- Bent or twisted uprights
- Cracked footplates
- Damaged beam connectors
- Missing safety clips or locking pins
Installing damaged components is a structural hazard, not a cosmetic issue. A deformed upright will not carry its rated load.
Step 3: Snap Chalk Lines to Mark the Installation Area
Use a chalk line to mark the front face of every column row along the full installation length. This reference keeps all bays in alignment as you build.
Without a chalk line, positional errors accumulate bay by bay. By the time you reach the end of a 15-bay run, the drift can be significant. Correcting it after anchoring means disassembly.
Step 4: Assemble and Erect the Starter Bay
- Mark beam elevations on both front and rear uprights with a permanent marker before lifting
- Position the first two uprights at the correct bay width per your layout drawings
- Install beams from the highest level downward — working top-to-bottom keeps the frame stable as you add each level
- Tap each beam into place with a rubber mallet and confirm safety clips or locking pins are fully engaged
Per ANSI MH16.1, beam locking devices must resist approximately 4.4 kN (1,000 lb) of upward force per connection. Check every beam end: present, engaged, undamaged.
Step 5: Build Add-On Bays Along the Chalk Line
For each subsequent bay:
- Mark beam elevations on the new upright before lifting
- Have a crew member hold the upright in position relative to the chalk line
- Install one beam at the top and one at mid-height to stabilize the upright
- Complete all remaining beams, checking alignment against the chalk line throughout
Never anchor any bay during this phase. Anchoring locks in misalignment and forces disassembly to correct it.
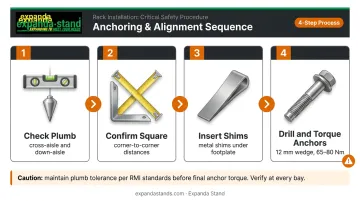
Step 6: Square, Plumb, and Anchor Every Upright
This is the most critical step. The RMI public specification sets maximum out-of-plumb at 0.5 inches per 10 feet (approximately 4.2 mm per metre) under load. Verify before loading.
Alignment sequence:
- Check vertical plumb in both cross-aisle and down-aisle directions using a level
- Measure diagonal distances between opposite corners to confirm the frame is square
- Insert metal shims under footplates as needed to achieve level
- Once the full row is aligned and confirmed plumb, drill anchor bolts per manufacturer specifications
With alignment confirmed, follow your anchor hardware specifications precisely.
Anchoring fundamentals:
- RMI requires at least one anchor per column
- Typical wedge anchors for standard baseplates: 12 mm (1/2 inch) diameter with approximately 65 mm (2.5 inches) nominal embedment
- Torque to the manufacturer's specified value in Nm (newton-metres); common 12 mm wedge anchors typically require 65–80 Nm depending on brand and anchor type
- Never exceed the specified torque: over-torquing can cause concrete splitting, anchor pullout, or steel failure
Anchor all footplates before any load goes on the rack.
Step 7: Install Accessories and Safety Components
Once all bays are anchored, complete these in order:
- Back connectors: Install loosely across the full row first, then torque to specification once the run is complete
- Wire decking: Install per manufacturer guidance; fasten non-waterfall decking where specified to prevent panels from falling between beams under load
- Column guards: Install at all aisle-facing uprights exposed to forklift traffic — these protect the most vulnerable structural point in any rack system
- Row spacers: Required for back-to-back runs; NFPA 13 rack storage research references minimum 150 mm (6-inch) transverse flue spaces at maximum 1.5 m (5-foot) intervals for sprinkler penetration
Post-Installation Checks and Validation
Assembly complete doesn't mean load-ready. Before any pallets go up, run through these checks systematically — they're what stand between a validated installation and a preventable collapse.
Visual Walkthrough
Walk the entire rack run and confirm:
- All beam safety clips are present and fully engaged
- All anchor bolts are installed and torqued
- Footplates are flush against the floor with shims secure
- No components were skipped during assembly
Functional Checks
- Verify uprights are within the 0.5-inch-per-10-feet RMI plumb tolerance using a level, plumb bob, or laser
- Measure all aisles against the layout drawing and confirm forklift clearance at every entry point
- Cross-check beam elevations against design drawings — one hole off changes usable pallet height across every level
What Happens When You Skip Validation
Racks that seem stable when empty can shift under the first full load if alignment or anchoring wasn't properly verified. RMI guidance is direct on this: out-of-plumb columns increase compressive stress and reduce the load capacity the rack was rated to carry. If any check fails, correct it before loading — retrofitting a fix under a loaded rack is far more dangerous and costly than addressing it now.
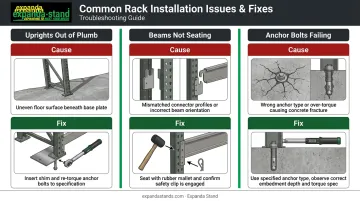
Common Pallet Rack Installation Problems and Fixes
Uprights Out of Plumb After Assembly
Cause: Shims were not used on an uneven floor, or anchor bolts were tightened before alignment was confirmed.
Fix: Loosen fasteners, insert correctly sized metal shims under the footplate, re-check level in both cross-aisle and down-aisle directions, then re-tighten to specification.
Beams Not Seating Correctly on Uprights
Cause: Beam connectors aren't fully engaged — often because the rack brand or connector style has been mixed (for example, a teardrop-profile upright paired with an incompatible beam connector).
Fix: Verify brand and connector compatibility before installation begins. For correctly matched components, use a rubber mallet to seat the connector fully and confirm the safety clip locks into place.
Anchor Bolts Pulling Out or Failing to Set
Cause: Wrong anchor type for the concrete strength, insufficient embedment depth, or over-torquing that strips the anchor's holding mechanism.
Fix: Use the anchor manufacturer's torque and embedment specifications for your actual floor slab rating. Torque values differ between anchor brands and are not interchangeable, so always verify specs per manufacturer documentation.
Catching these issues early keeps your installation on track. Once your racks are plumb, anchored, and beam-seated correctly, your setup is ready for load testing and final inspection.
Pro Tips for a Smoother Pallet Rack Setup
A few habits separate a clean installation from one that needs rework halfway through:
- Mark beam elevations on paper before lifting anything — knowing exactly where each beam goes prevents re-installation and ensures load capacity is distributed correctly across levels
- Anchor once, anchor right — never drill until the entire row is assembled, aligned, and plumb; anchoring early locks in any misalignment and forces disassembly to correct it
- For complex multi-aisle or custom-dimension setups, consider a full-service provider like Expanda Stand — their custom-fabricated rack systems are engineered to your floor plan, load specs, and aisle layout before installation begins
Conclusion
Rack installation quality determines the safety, storage efficiency, and service life of the entire system. A rack that is correctly aligned, anchored, and accessorised will carry its rated load reliably for years. One rushed through alignment, or left unanchored because it "looked straight," is a structural liability waiting for a load event to expose it.
Treat each of the 7 steps as non-negotiable:
- Prepare the site thoroughly before any component is placed
- Build from a true chalk line, not an assumed one
- Plumb every bay before drilling a single anchor point
- Complete the full validation check before the first pallet goes in
The right racking system also starts with the right supplier. Expanda Stand's pallet rack and industrial storage solutions are manufactured to ISO 9001:2015 standards, so the structural integrity is built in before installation even begins.
Frequently Asked Questions
How should pallets be placed on pallet racks?
Pallets should be centred on the beams with equal overhang on each side, placed with the skids running perpendicular to the beams for stability. Never exceed the posted load capacity for that beam level — the rated capacity applies to the entire level, not a single beam alone.
How do you calculate pallet rack capacity?
Rack capacity is determined by two separate ratings: the upright frame capacity (total load across all levels on that column) and the beam capacity (maximum load per shelf level). Both are specified by the manufacturer. Store the heaviest loads on the lowest beams to reduce bending stress on upper levels.
What is the height-to-depth ratio for pallet racks?
Industry standards set a maximum height-to-depth ratio of 6:1 for freestanding racks, meaning a rack 6 metres tall requires a minimum frame depth of 1 metre. Exceeding this ratio increases tipping risk in forklift-accessed or seismic-zone environments.
Do pallet racks need to be anchored to the floor?
Anchoring is required in almost all cases. Some manufacturers permit an exception for racks under 2.4 metres that are manually loaded in low-seismic areas, but even then anchoring is recommended. Any forklift-accessed or taller rack must be anchored to a rated concrete slab.
Can one person install pallet racks?
No. Installation always requires at least two people , with one person holding uprights in position while the other installs beams. For bays above waist height, a certified forklift operator and additional crew are required for safe assembly.
How long does pallet rack installation take?
A small single-aisle installation of 10–15 bays typically takes one to two days for an experienced crew. Larger multi-aisle setups can take several days to a week, depending on rack height, beam levels, and floor preparation requirements.